PowerShell change Windows Firewall profiles for company networks
In this post we are focusing on the Windows Firewall and how we can change the firewall profile with PowerShell.
Windows Firewall Profile types
A quick reminder on what firewall profile are on every Windows system (Taken from Microsoft Docs):
| Profile Name | Description |
|---|---|
| Public | The default profile is the public profile, which is used to designate public networks such as Wi-Fi hotspots at coffee shops, airports, and other locations. |
| Private | The private profile is a user-assigned profile and is used to designate private or home networks. |
| Domain | The domain profile applies to networks where the host system can authenticate to a domain controller. |
The problem with the Public profile
So every network I connect to for the first time has the Windows Firewall profile type of Public. In the modern workplace world where every Windows Client is now Azure AD joined and not Active Directory Joined anymore this can be problematic because the Public Windows Firewall Profile is used.
So if a company has apps that need to open ports on the Windows Client machine you have to open that on the Public profile. That is definitely not recommended. So how can we change that especially if the Windows Clients are Azure AD joined and only for the company networks?
Solution
Step 1: Check the Windows Event Log
The first step is to check if a Windows Client is connected to any Network. You can get the information through the Windows Event Viewer. The Event log name is: Microsoft-Windows-NetworkProfile/Operational. It can be found in Application and Services Logs/Microsoft/Windows. The Event you have to check has the ID 10000.
Step 2: Create a Scheduled Task
But how can you check if the Windows client is connected to any network? You don’t want to implement some kind of watcher that will consume system resources to check if this event was fired. Instead of that you can use a Scheduled Task. If you don’t know this you can trigger a scheduled task based on a Windows Event Viewer event. It looks like this:

you can also create a basic event trigger. You do not have to fight XML
So if this event occurs we will execute a PowerShell script which will take care of the profile switch.
For this we have to create an Action.
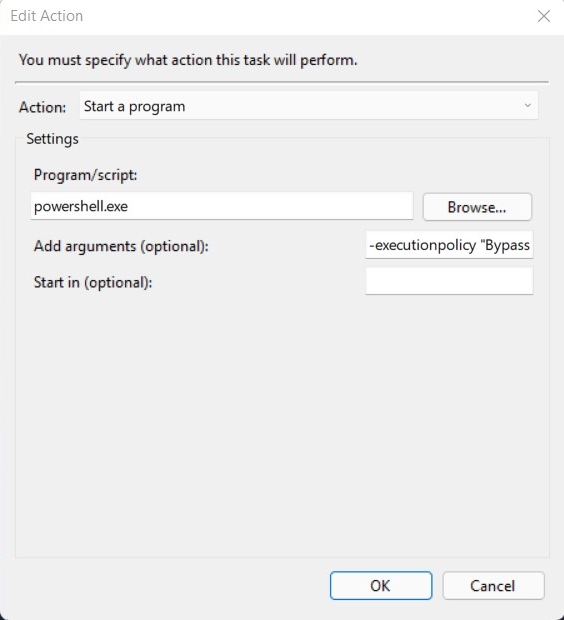
Arguments:
1
-executionpolicy "Bypass" -File "<Path to the script>"
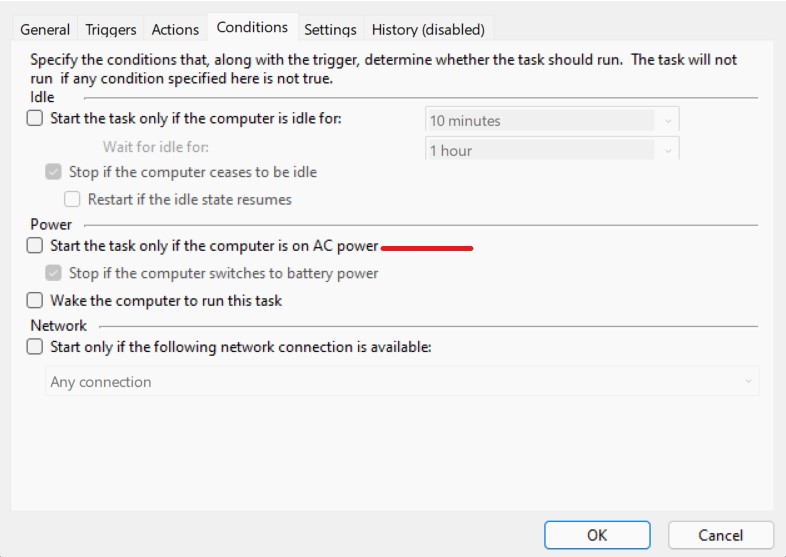
If this tasks ran only on Workstations you are golden. If you have Notebooks where this script should ran you need to have one Scheduled Task conditions disabled:
Start the task only if the computer is on AC power
Step 3: The script
You can run this script on Windows Client operating systems (tested on Windows 10 21H2) without any problems. If you want that also for Windows Server you have to change the script a bit.
1
2
3
4
5
6
7
8
9
10
11
12
13
14
15
16
17
18
19
20
21
22
23
24
25
26
27
28
29
30
31
32
33
34
35
36
37
38
39
40
41
42
43
44
45
46
47
48
49
50
51
52
53
54
55
56
57
58
59
60
61
62
63
64
65
66
67
68
69
70
71
72
73
74
75
76
77
78
79
80
81
82
83
84
85
86
87
88
89
90
91
92
93
94
95
96
97
98
99
100
101

# Enable Transcript if you want
Start-Transcript -Path C:\Windows\Logs\Software\Transcript.log -Append

# Define the names of your company network for WLAN and LAN
$WLANName = "<WLAN Name>"
$LANName = "<LAN Name>"

# Check if you have a WLAN Device in your Client.
$WLAN = Get-NetAdapter -Physical |
Where-Object -FilterScript {
    $_.PhysicalMediaType -eq 'Native 802.11' -or
    $_.PhysicalMediaType -eq 'Wireless LAN' -or
    $_.PhysicalMediaType -eq 'Wireless WAN'
}
Write-Output "WLAN Connection:"
$WLAN

# Check if you have a LAN Device in your Client.
$LAN = Get-NetAdapter -Physical |
Where-Object -FilterScript {
    $_.PhysicalMediaType -eq '802.3'
}

Write-Output ""
Write-Output "LAN Connection:"
$LAN

Write-Output "Check which connection is up"

# If WLAN is connected on your Client
# the profile name has to be the same as the variable defined above.
# If that is the case the network profile is changed.
# If the network profile is already private then nothing will change.
if($WLAN.Status -eq 'Up')
{
    Write-Output "WLAN in up."

    Write-Output "Get the Netconnection profile"
    $Profile = Get-NetConnectionProfile

    Write-Output "Profile Info for WLAN:"
    $Profile

    Write-Output "Only Change Network Info if Name = '$WLANName'"

    If($Profile.Name -eq $WLANName) {
        if($Profile.NetworkCategory -eq 'Private') {
            Write-Output "Profile $($Profile.Name) is already Private."
        } else {
            Write-Output "Setting Profile to Private."

            $splat = @{
                InterfaceIndex  = $Profile.InterfaceIndex
                NetworkCategory = 'Private'
            }
            Set-NetConnectionProfile @splat
        }
    }
}
else
{
    Write-Output "WLAN is not up."
}

# If WLAN is connected on your Client
# the profile name has to be the same as the variable defined above.
# If that is the case the network profile is changed.
# If the network profile is already private then nothing will change.
if($LAN.Status -eq 'Up')
{
    Write-Output "LAN in up."
    Write-Output "Get the Netconnection profile"
    $Profile = Get-NetConnectionProfile

    Write-Output "Profile Info for LAN:"
    $Profile

    Write-Output "Only Change Network Info if Name = '$LANName'"

    If($Profile.Name -eq $LANName) {
        if($Profile.NetworkCategory -eq 'Private') {
            Write-Output "Profile $($Profile.Name) is already Private."
        } else {
            Write-Output "Setting Profile to Private."

            $splat = @{
                InterfaceIndex  = $Profile.InterfaceIndex
                NetworkCategory = 'Private'
            }
            Set-NetConnectionProfile @splat
        }
    }
}
else
{
    Write-Output "LAN is not up."
}

# Stop Transcript if you use transcription
Stop-Transcript
You can package that now an bring it to your Windows Clients. Happy Windows Firewall profile switching.